|
Getting Started!!
You need to first download Mirc. Mirc is an IRC
client and is needed in order to get to Anime Pocket.
It's also helpful to have if you want to download files you
can't otherwise get through your browser (such as anime!).
Download Mirc at www.mirc.com.
Install it where ever you want then double click on the main
icon to run it.
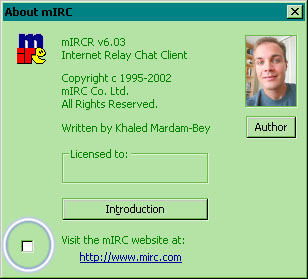
What you may want to do is decheck the box on
the "About Mirc" window. The box is circled on the diagram on
the left. You dont want pesky windows like this getting in the
way each time you boot Mirc. Hit the "X" on the upper right hand
corner to close the window.
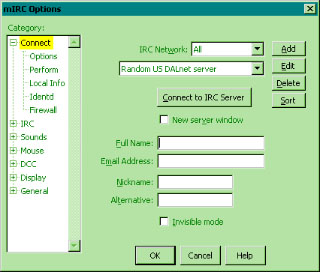
Now the window you should see should look
something like the diagram on the left. For right now, we aren't
going to set up the servers we want to connect through with the
options available here. For the time being, just fill out the
fields. For example: Full Name, E-mail Address, Nickname and
Alternative. Alternative is just an alternative nickname if
someone is already using the one you first selected.
Once you're done doing all of that, click ok
and proceed to the next diagram.
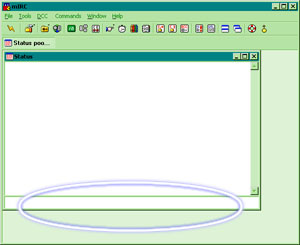
Now, you will see this part of Mirc. This is
probably one of the most confusing parts of mirc. Never fear.
What we will do here is practice the commands needed to connect
to Anime Pocket. Now, at the bottom of the chat window,
I've circled the portion where you type. You will need to type
commands here. The first command you need to type is "/server
irc.mircx.com" without the quotations. Enter in that command and
press enter. Soon you will see a bunch of words flying upward.
That's normal. Once the words are done flying, you'll see a
window displaying a list of potential channels (Channels are
chatrooms) to join. Simply decheck the box that says "Pop up
window on connect" and close that window. Now, enter in the chat
window "/j #anime-pocket" without the quotations. After you
enter in that command, you will be in Anime Pocket!!
Setting up Mirc!!
Before you can do any downloading, you need to
set up Mirc to work for you! The best thing as of now is to set
the chat color. I recommend setting the chat window's background
to be black instead of white. To do that, click the crayon icon
located on the top. The icon is circled on the diagram [Diagram].
Now, you have to set mirc to accept files. In
order to do that, you will need to go to File --> Options.
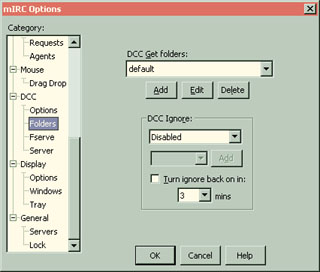
You'll see the options window. It's the same
window you saw when you first started Mirc. On the left are a
list of options. Scroll down to the "DCC" option. Click the "+"
on the left side of DCC name. The DCC options will expand.
Select the "folder" sub-option. Now, set the "DCC Get Folders"
to "default". Set "DCC Ignore" to "Disabled" and be sure to
decheck (or uncheck) the "Turn ignore back on in" option. Once
you're done, click the DCC name once. You'll now be in the DCC
main options.
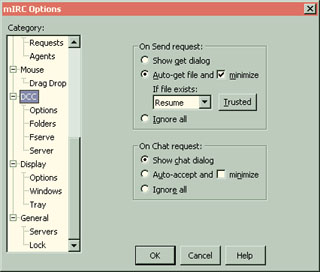
In the "On Send request" box, click the
"Auto-get file" circle. Be sure the box next to it that says,
"minimize" is checked. Now, choose "Resume" on the "If file
exists" menu.
It's a good idea that we set Mirc to
automatically connect to Anime Pocket on startup. On order for
us to do that, we'll need to create a script. A script is a
series of commands that run certain functions automatically.
Scripts are useful to have in order to automate certain tasks.
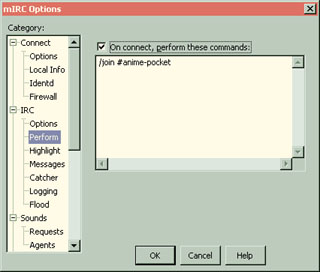
Scroll up until you see "IRC" click the "+" next
to the IRC name. The IRC options will then expand. Select the
"Perform" sub-option. Note: Some
versions of Mirc have the Perform sub-option under "Connect"
instead of "IRC". Within the huge text box, type
"/join #anime-pocket" without the quotations. Be sure to check
the "On connect, perform these commands" located on the top.
Once you're done, click ok.
We're not done yet. On the top menu of Mirc,
click the Green icon with the "/A" depiction on it. To identify
the proper icon, check the diagram [Diagram]. Now, click the
"remote" tab 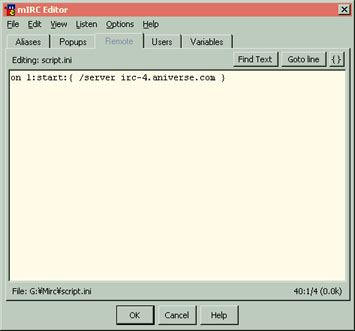 and put in this command at the very top of the text
box, "on l:start:{ /server irc.mircx.com }" without the
quotations. After that, click ok. You have no set Mirc to work
for you!! and put in this command at the very top of the text
box, "on l:start:{ /server irc.mircx.com }" without the
quotations. After that, click ok. You have no set Mirc to work
for you!!
Using Fserves!!
Fserves can be complicated to learn, but with
practice, they'll become useful in all the information they give
you and all the files they'll provide you.
Fserves are servers that other people host on
their computers. They share their files through these fserves.
In order for you to download anything from Anime Pocket, you
need to connect to an fserve.
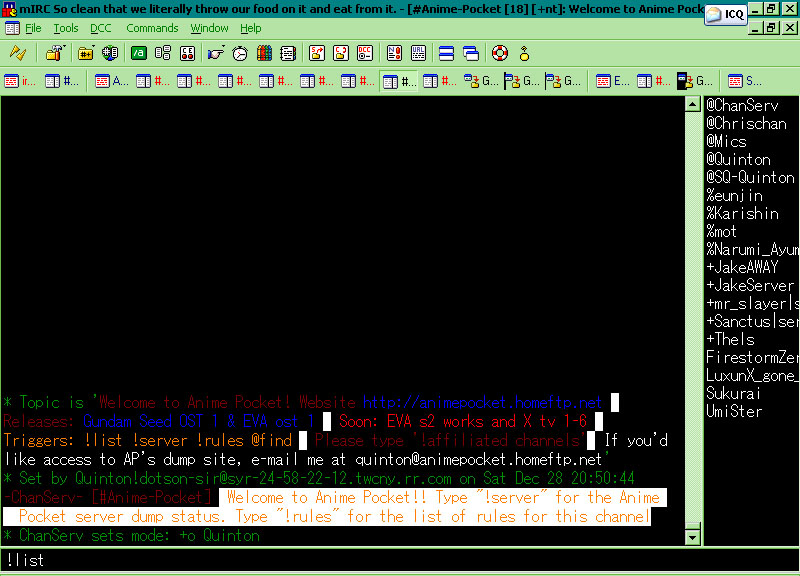
The first thing you'll need to do is type
"!list" [Diagram 1 &
Diagram 2]. Once you type
it, a series of colorful words will fly upward. Those words are
important. Depending on what each fserve says depends on what
files you'll get from each individual one.
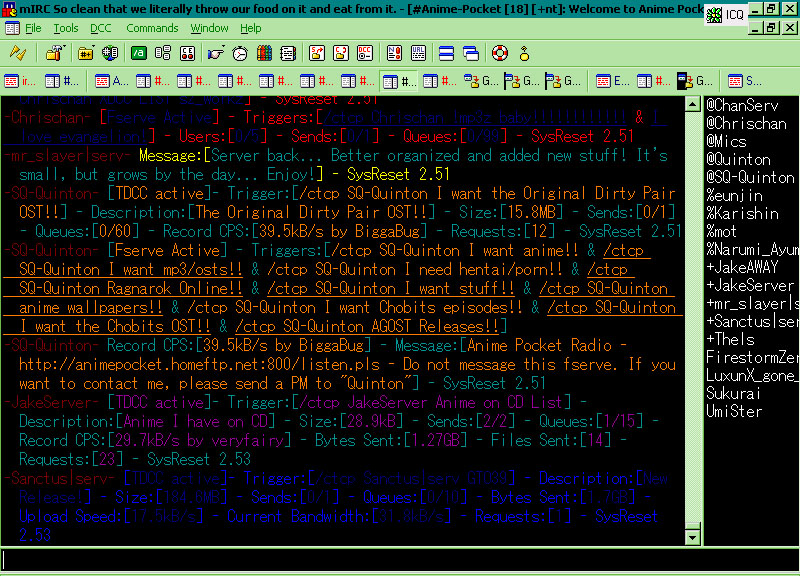
Here's an example of what an Fserve may look like:
-SQ-Quinton-
[Fserve
Active] - Triggers:[/ctcp SQ-Quinton I want anime!!
& /ctcp
SQ-Quinton I want mp3/osts!! &
/ctcp SQ-Quinton I need hentai/porn!!
& /ctcp
SQ-Quinton Ragnarok Online!! &
/ctcp SQ-Quinton I want stuff!!
& /ctcp
SQ-Quinton anime wallpapers!! &
/ctcp SQ-Quinton Chobits and Samurai
Deeper Kyou!! &
/ctcp SQ-Quinton I want the Chobits OST!!
& /ctcp
SQ-Quinton AGOST Releases]
This may all seem like greek to you. Once you
learn how to read these correctly, they'll serve only the
purposes of helping you.
The red name "-SQ-Quinton" is the name of the
fserve. Usually this fserve would have something to do with the
owner. Many ppl use something called "clones" to host their
fserves. Clones is simply the same user using two accounts
instead of one. It's much like logging into a chat with two
browsers simultaneously. It'll look like two ppl, but it's
actually just one.
The [Fserve Active] simply means that the fserve
is ready for use. If it wasn't, it wouldn't show up at all.
The Triggers:[ ] is the most important part of
fserves. These are commands you must type in order to access the
fserve. Each command is separated by a "&". The different
commands host different files. For example: the "I want anime!!"
trigger would host anime files while "I want mp3/OSTs" would
host mp3 files and other audio media. To check out what the
fserve has in which ever catagory the triggers are displayed,
simply write out the command. For example: "/ctcp SQ-Quinton Ragnarok Online!!" Once
you do that, a window will pop up.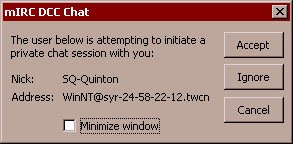 The window will look like the diagram shown on the
right. Simply click "Accept" to connect to the fserve. In many
cases, you may not be able to see this window right away. You
may come across a message like this: "Server
Notice: This server is using an alternate send method, please
make sure your DCC Server is active and set to port 5990. /dccserver
+sc on 5990." If you do come across such messages, simply
type the "/dccserver +sc on 5990."
Depending on the feserve depends on the number. You may not have
to type "5990" on some fserves. The numbers may be different, so
pay attention to what it tells you to type. The window will look like the diagram shown on the
right. Simply click "Accept" to connect to the fserve. In many
cases, you may not be able to see this window right away. You
may come across a message like this: "Server
Notice: This server is using an alternate send method, please
make sure your DCC Server is active and set to port 5990. /dccserver
+sc on 5990." If you do come across such messages, simply
type the "/dccserver +sc on 5990."
Depending on the feserve depends on the number. You may not have
to type "5990" on some fserves. The numbers may be different, so
pay attention to what it tells you to type.
From Within the Fserve!!
Believe it or not, once inside an fserve, the
commands that are needed to browse it are completely different
than the commands needed to browse IRC. Inside an fserve, you'll
use DOS like commands such as "dir" and "cd".
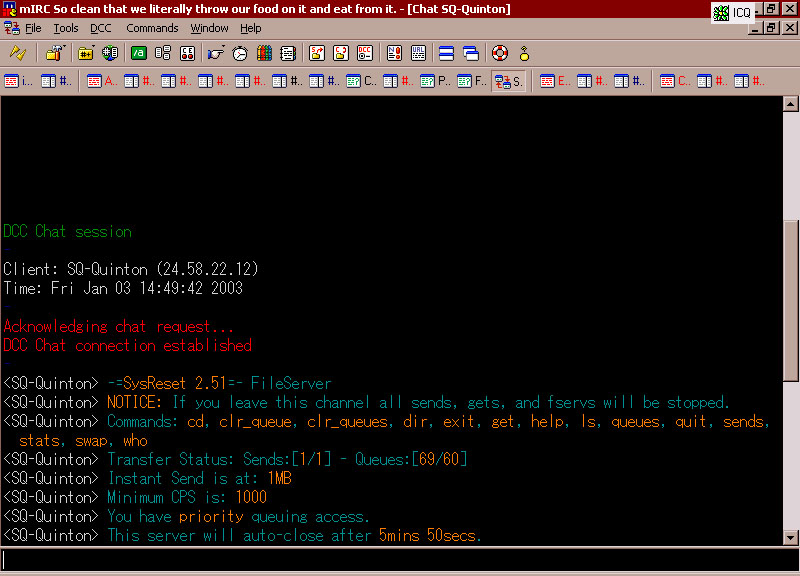
When you connect to an fserve, you'll get this
screen [Diagram]. At a
first glance, the information that is listed is confusing. I'll
explain them for you.
Commands: cd,
clr_queue,
clr_queues, dir,
exit, get,
help, ls,
queues, quit,
sends, stats,
swap, who
- The list of commands that can be used
within an fserve.
Transfer Status: Sends:[ ] Queues: [ ] -
Shows the current number of files being
sent from the fserve as well as the current number of queue
slots (Queue slots are reserved spaces for those who wish for
their file to be sent. Think of it as a waiting line to get
files)
Instant Send - If you
attempt to queue a file below the given instant send size, it'll
send the file instantly.
Minimum CPS - Transfer
speeds that are below this number will first get a warning and
then the fserve will abort the transfer. Most fserves have this
enabled in order to speed up the line.
Maximum CPS - This
displays how fast your download is allowed to go. It will not
exceed this number. That is because the fserve restricts it.
Note: CPS can be easily readable if you take the
three zeros from the end. For example 1000 CPS would be 1 KBps
[kilobyte per second]. 20000 would be 20 KBps.
If you see this, "You have priority queuing access."
It means that when you queue a file, it'll go way in the front
of everyone else's queue. Think of it as cutting in line.
Downloading Files!
Now that you know what
those all mean, type "dir". This will give you a list of what's
inside the fserve. [Diagram] Directories are in upper case while files are
in lower case. To enter a directory, type "cd <directory name>"
without the quotations. Replace <directory name> with the proper
directory name. For example: "cd DRAGON DRIVE". Once inside the
directory, type "dir" without the quotations to see what's
inside the directory. To download a file, type "get <file name>"
without the quotations. Replace <file name> with the proper file
name. For example: "get dragon_drive eps 2.avi". Remember that
spaces ARE allowed if the file name has them.
If you want to go back to
the previous directory you were in, type "cd.." without the
quotations. Be sure to add the two periods at the end. Remember
that there's no space behind the "cd" command for going up a
level (or rather, go back to your previous directory).
Note: A good mirc trick is
to do a copy and paste. Instead of typing all of the words by
hand, simply highlight the file or directory name (or if you're
typing in an fserve trigger, highlight the trigger's name). Keep
you finger on the mouse button while the name is highlighted and
hold "ctrl" and press "c" on your keyboard. Now, to paste the
name you copied, hold "ctrl" and press "v". It'll now show up on
the bottom of your chat window. If it doesn't, then try the
process again.
If you come across an
error like this, "Invalid file
name, please use the form: <
get filename.ext >" and "This server does NOT handle wildcards ( *.* )". It means you typed the name of the file
incorrectly or that the file may not exist. If you're sure the
the file is there, then look over the name of the file carefully
and type it again.
Learning the Fserve Commands!
Now, for a review of the commands used in an
fserve. These commands can prove to be helpful for many type of
situations.
cd <directory>: This
command allows you to go back one or several directories. It
also allows you to enter a directory. Simply substitute
<directory> with the name of the directory. For example: "cd DBZ".
You can also use this command to go back one or several
directories. For example, if you're in the dbz folder and you
want to go back to the main directory, simply type "cd..". Be
sure to include two periods after the "cd" command.
clr_queue <number>: This
command allows you to delete any one of your queues. It's
possible that you may make a mistake and queue the wrong file.
Simply use this command and replace <number> with the number
your queued item has been placed in.
clr_queues: This command
deletes all the queues previously entered.
dir: This command lists
the directories available within the fserve.
exit: Exits the fserve
help: This may be useful
if you forget the commands listed here. Help simply gives you a
list of commands that you can use within the fserve.
ls: This lists the
directories much like "dir" does. However, this command lists
the directory horizontally instead of vertically. It's useful to
see more directories listed per screen.
queues: This command lists
the current queues on the fserve. Not only will it show the
files you queued, but it'll show the files other users queued
quit: The same as "exit"
sends: shows which files
the fserve is sending at that moment.
stats: This shows a list
of potentially useful information on the fserve. It lists things
from the number of sends to the number of accesses that fserve
received since its first day of activation.
swap <number1> <number2>:
This command has the power to switch your queues. If you'd like
one of your later queues to be sent first, simply swap it with
the first queue you've made. Not every fserve has this enabled.
Creating your own Fserve!!
STOP!!!
If you have not read the first basic steps on
how to set up Mirc, then this section will be very difficult to
understand! Much of the terminology mentioned in the previous
section will be applied here. I will only assume that you know
all the basics of Mirc before you continue.
Ok! If you wish to host a fserve in Anime
Pocket or any other channel, then you cannot use the Mirc
you downloaded. You will need a special version of Mirc called
System Reset. You can get System Reset at
www.sysreset.com. It is
recommended that you install System Reset (we'll call it
Sysreset for now on) over your Mirc. It's possible that many of
your settings will disappear, but you can set all of those back.
Once you install Sysreset and join Anime
Pocket, you will first want to activate it and assign what
files you wish to share with the community. To do this, click
Sysreset on the drag down menu and then go to File Server
Manager. A window will then appear with a buttload of options.
The first thing you may want to do is set the max queues, the
max sends and how many users are allowed to browse your fserve
at one time. Click the "Server Config" tab. On the far left hand
side, set max users to 10. On the far right hand side, set the
max sends to "1" and "1". Set the max queues to "3" and "10".
Below that will be the Resends option. Set that to "20". Now go
to the "File Server Triggers" tab. Click "add" to create your
own trigger. Follow the instructions it gives you. Just remember
that a welcome file has to be a text file. Once you're done, the
name of your trigger will appear on the field on the left.
Simply select it (highlight it) and check the "/CTCP Trigger"
box. That will make your triggers silent (which is a good
idea!). Add as many triggers as you want. Be sure to make them
all silent. After that, click done and you're finished!!
If you're behind a firewall or are having
problems with people connecting to you, you will have to enable
the firewall work around. Simply go to the File Server Manager
and click the "Server Config" tab. Click on "Basic Options" and
select "Advanced Options". On the far left is a box that says
"Firewall Workaround". Check that box and another window will
appear. Set the port to 5052 (or which ever port is open on your
computer) and then click ok. Click done and it should now work.
Your fserve will have many other options not
mentioned here. This is when you're on your own. I highly
recommend you play with those other options and set your fserve
so it can incorporate those other options as well. The more you
learn about your fserve, the better it will become.
|


