You've came to the right place if you need more help drawing eyes. So, what is your exact problem?
Choose from the selection above. One of them should represent your problem.
If you can't find your problem here, then try browsing through all of them.
If that doesn't help, then e-mail me at dotson-sir@rocketmail.com.
| I can't draw eyes at all!! |
You can't draw eyes at all?! Oh geez! Well, before I get into the tutorial, your mind must be filled with valuable knowledge!
 In drawing the eyes, you must think of which way the head is facing.
When
you draw anything from a 3/4 view you must realize that the eye on the farthest
end of the face will be slightly "thinner". No, it won't be shorter. Many
ppl make that mistake and make the eye shorter (or smaller). It's just thinner.
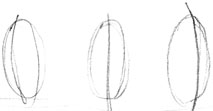
When drawing from the profile view, the eye will not look like it would when
in other angles. The eye should be thinner. Take a look at the diagrams.
They will show you what I mean.
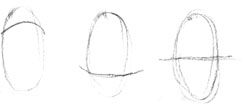
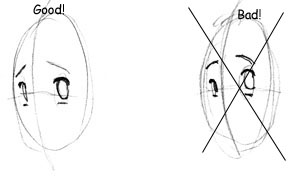
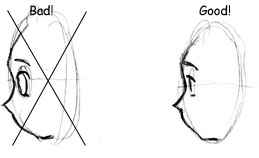
The first thing you also must know is that no matter which way the head is
facing, it will always look like an oval! I don't care if the character is
looking up or down, left or right. The dimensions of the oval DO NOT change.
Got that? If you know that the oval (the basic geometrical shape of the head
or the rest of the body) doesn't change, then you shouldn't have any trouble
drawing the head proportioned to the body.
Now, let's begin!
Lesson 1:
Step 1:
Draw the head first!! Draw it! You may want to learn how to draw the eyes
according to what ever character you have laid out, but this is important.
If you don't know how to draw the basic diagrams on your character, then
things will look uneven! Just draw the head in the shape of an oval.
Step 2: Draw a vertical line in the middle of the face.
When I say "face" I mean draw the vertical line according to the position
your character is facing. The line can either be in the middle of the oval
(which would have the character facing forward) or on the sides (signaling
that the character is either facing left or right). Hint: If you're drawing the profile view of your character, then do not draw a vertical line.
| 
|
Step 3: Draw a horizontal line. This line determines whether your character is facing up or down. Hint: If you're drawing a profile (diagram located on the bottom) view of your character
and you want them looking up or down, you will actually have to tilt the
oval in the position that head would be facing. The horizontal line will
always be located in the center of the oval (unless you're doing something
dramatic, but don't worry about that. That's far too advanced for you if
you're here).
| 
|
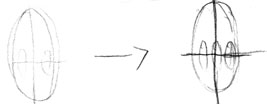
Step 4: Now, you're ready to draw the eyes. Now, for
you to know exactly how far apart they should be, understand that the eyes
are about an eye length away from each other. If you're having trouble, then
draw a small oval representing an eye in the vertex of the two lines. From
there, draw two ovals right next to it on opposite ends. Check the diagram
to understand what I mean.
|
| Hint: If you're drawing a profile view or 3/4 view, be sure that with
the 3/4 angle, the eye on the farthest end is thinner than the eye on the
closest end. With the profile view, be sure that the eye is thin and not
as wide as it would be in other angles. If it helps, draw an oval representing
the eye. Make the oval thin so you know to draw the eye detail within that
oval.
| 
|
Step 5:
Now, with that out of the way, go get a separate piece of paper or find a
good space on the paper you're already using. Draw another oval and attempt
to draw the eyes on the diagram.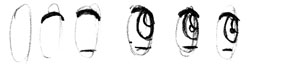
Hint: It's best to start out with the outer rim of the eye. Then draw what's inside the eye. Eyes shouldn't be that complicated.
|
Step 6:
Now, apply what you drew in the lone oval into the ovals you drew on the head, and You're done!
Naturally, you should erase the lines and circles. That's the basic step to cleaning up your picture.
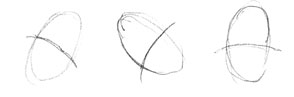
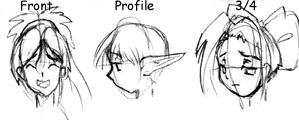 For those of you who are still confused about the 3/4 views and other angles, take a look at this diagram.
Hopefully this will make things a little simpler.
| I can't draw shinny/cute eyes! |
You're kidding me, right? Basically, all you need to know is the detail
within the eye. Cute eyes are naturally shinny, so all you need to learn
how to do is make these eyes shinny. As I said before, cute eyes are usually
bigger, so it's best to draw them big. Evil eyes are the exact opposite.
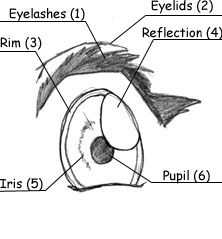
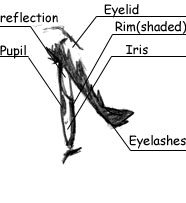
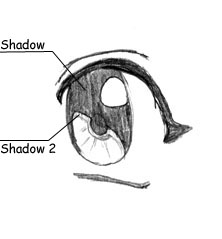
Well, here is a good sized diagram. I will elucidate
on the eye by explaining to you what you can use to make the eye look cool!
There are many different methods of drawing a shinny eye. You don't necessarily
have to draw it how I'm presenting it, but it will give you some ideas.
- Eyelashes - Most female eyes
have these. I don't really draw thick eyelashes, but you can if you want.
Also, the little triangle located on the far right of the eye is considered
an eyelash too. Even though I don't make the the eyelashes thick, I usually add that little triangle on most female eyes.
- Eyelids - Draw these if you want
to. Most anime characters feature these lines. They can be drawn for added
emotion. Depending how high up you draw them depends on how much closed the
eye is. Usually when I draw them high up, the character seems more restless
or sad.
- Rim - The rim of the eye on the
top diagram isn't colored, but it can be (example on profile view diagram).
it usually adds the effect of an eye being shinny.
- Reflection - Draw this according to where the light source is. The reflection also makes the eye seem more shinny.
- Iris - The iris here has a little
scribble. That scribble is the detail of the iris. Adding such detail gives
more life to the picture.
- Pupil - If you add all of the
detail above, it would only be natural to draw a pupil. When you draw a pupil,
remember that it's BEHIND the reflection.
|
|
 You don't have to draw eyes the way I draw them. There are other things you
can add to make the eye look cool. Check out these diagrams.
You don't have to draw eyes the way I draw them. There are other things you
can add to make the eye look cool. Check out these diagrams.
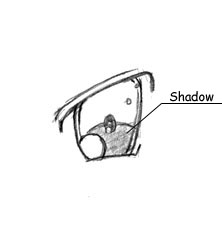
The first diagram here has something called a shadow.
Usually these shadows show up on anime characters. It's just an alternative
way of making an eye shinny. The second shadow just makes the eye seem a
bit more shinny while adding detail to it. In most cases, it works well.
With the picture on the left, you can see how the shadow
is located on the bottom as well as the reflection. The reflection doesn't
have to be located on the top all the time. You can put a reflection just
about anywhere. The reflection, after all, faces the direction of the light
source. If the light source is coming from underneath, then it would only
be natural to place a reflection on the bottom of the iris.
Also, there are more than just one reflection. As you can see, the reflection
are presented in a straight line. I added 3 reflections that span from the
bottom left to the upper right. If you observe closely, you can see that
the more I make in that line, the smaller they get. So, I would recommend
that if you create more than one reflection, to make the following reflections
smaller.
 Oh, I forgot to mention!!
  The line underneath the pupil of the entire eye can be altered. The line
doesn't have to be exactly horizontal. You can tilt it or make it round.
Take a look at the examples left and right of this paragraph.
The line underneath the pupil of the entire eye can be altered. The line
doesn't have to be exactly horizontal. You can tilt it or make it round.
Take a look at the examples left and right of this paragraph.
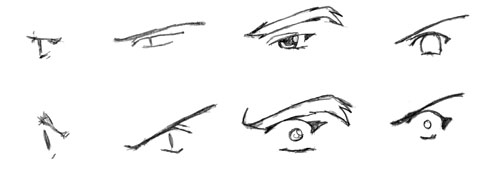
| I can't draw evil looking eyes! |
Evil eyes, for the most part, are sleak-looking. Drawing them slim, shallow
and less shinny usually gives the feel for evil. Evil eyes are also less
expressive.
Take a look at the diagram above. On the top row we have
evil eyes; the first eye being from a profile view. On the second row, we
have evil eyes with surprised looks. If you observe the eyes closely, you
can see how the eyes are less shinny and have a pretty sleek look to them.
Many evil eyes look as if they are staring past you. Another observation
you should make is the way the eyebrows are drawn. Since evil eyes are less
expressive, just draw the eyebrow inward so the eyes always look angry. This
technique can also work on cute eyes that you want to look evil.
The surprised eyes are to show that the bottom eye lashes are not necessarily
flat. If you do decide to make such eyes, remember that the iris is much
smaller while the eye is much larger. Which ever way you draw the eyebrows
determines how their expressions are. If their drawn in toward the eye, then
they can be furiated or shocked. If it's curved upward, then they can be
extremely sad or shocked. Usually, you will get that generic "shocked" look.
I find those expression to look really cool!
| My eyes look like male/female eyes! |
All you need to know are the differences between the male and female eye. 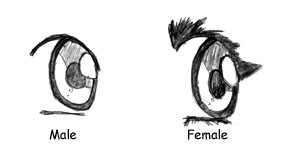 You should know the similarities already, but what exactly makes them so
different, you might ask. It shouldn't be hard. The eyelashes are what makes
them different. Females have more detailed eyelashes than males. In some
styles, the male may not have eyelashes at all while the female does. If
you want your male characters eyes to look less feminine, then don't draw
the eyelashes. If you want the eyes to be more feminine, then draw some eyelashes.
You should know the similarities already, but what exactly makes them so
different, you might ask. It shouldn't be hard. The eyelashes are what makes
them different. Females have more detailed eyelashes than males. In some
styles, the male may not have eyelashes at all while the female does. If
you want your male characters eyes to look less feminine, then don't draw
the eyelashes. If you want the eyes to be more feminine, then draw some eyelashes.
Neither male or female characters have to have eyelashes. Both of them could
have eyes that look the same, just as long as the facial and body features
appear to look like which ever gender they belong to.
words|| Takeshi Takebayashi
Email: dotson-sir@rocketmail.com
AE and the AE webdesign was created by Steven Dotson III. The
president of Anime Edge.
|